Ashila Putri Sandi (0332938)
Packaging & Merchandising Design
Project 1
Instruction
Project 1: Paper Bag, Book Sleeve Design (20%)
The Brief
Students are required to design a paper bag, book sleeve and one other item of your choice for book design in Publishing Module. The design must reflect the book design. The design should have the same design language of the book cover/layout.
Project Timeline
Week 3: Bring sample of paper bag, book sleeve and other item in class.
Week 4: Bring in 10 sketches of your concept and suggest new material for the packaging.
Week 5: Make actual 3 dimensional comps that take into consideration each side of the product to finalize your design.
Week 6: Submit your assignment. You have to professionally photograph the final product as evidence for TDS website.
Objective
1. To develop students sensitivity to typography, grid and layout.
2. To develop students understanding of the hierarchy of information.
3. To develop students ability to communicate visually.
Learning Outcome
Learning outcome of the exercise is about convincing a consumer to buy into an idea. You will be also introduced to the concept of the target audience and will be asked to consider a relevant target audience for their product when coming up with their ideas.
Project 1
Week 3
On the 3rd week Mr Shamsul asked us to look for reference for our Project 1. We needed to look for book sleeve, paper bag, and another item's packaging which we could choose freely as long as it's connected to the theme of the book from Publishing II last semester. Right after that on the following week we were told to show Mr. Shamsul our initial sketches for the 3 item (paper bag, book sleeve, and I chose button badge for the other item).
Week 4
I showed Mr. Shamsul my sketches and he accepted my ideas, however he gave me some ideas for the paper bag design. Then we were told to do our mock up/ prototype for the following week because we were doing thermoforming exercise on the next session this week.
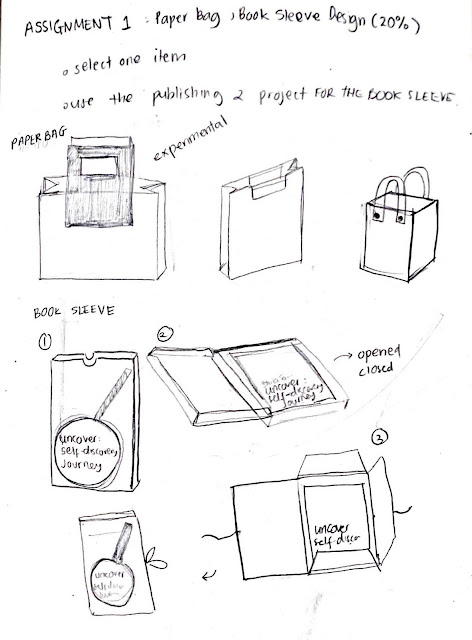 |
| Fig 1.1 Initial Sketches (Paper Bag and Book Sleeve) |
 |
| Fig 1.2 Initial Sketches (Paper Bag and Book Sleeve) |
 |
| Fig 1.3 Initial Sketches for Button Badge Packaging |
Week 5
On this week I was only able to make the button badge and book sleeve prototype because I ran out of paper for the paper bag. It wasn't that neat but from this prototype I could measure the size for the die-line and also look and feel the real packaging. Moreover, I could also decide which material should I go for.
 |
| Fig 2.1 Prototype for Button Badges and Book Sleeve (1) |
 |
| Fig 2.2 Prototype for Button Badges and Book Sleeve (2) |
Week 6
This week we were supposed to finish all the die-lines and produce the actual packaging.
 |
| Fig 3.1 Paperbag Die-line |
 |
| Fig 3.2 Button Badges Die-line |
 |
| Fig 3.3 Book Sleeve Die-line |
Submission
 |
| Fig 4.1 Button Badges Packaging (1) |
 |
| Fig 4.2 Button Badges Packaging (2) |
|
 |
| Fig 4.3 Button Badges Packaging (3) |
|
 |
| Fig 4.10 Paper Bag (3) |
 |
| Fig 4.11 Paper Bag (4) |
Reflection
Experience
From this assignment I encountered a lot of problems when doing packaging design. I love designing a packaging, but I didn't like cutting stuff and I wasn't that diligent when it comes to crafting. It was very frustrating for me to work neatly because I kept on failing while trying to make the prototype. I gave up easily while doing this project. I did not really think about the bleed while doing the laser cut, thus it my packaging didn't turn that well. Moreover, because the printing shop that I went only provided 2 types of paper, I couldn't really choose the type of paper for my paper bag. Hence, it was very hard for me to fold it, and due to time constrain and the price of re-printing was quite expensive so I couldn't print it out again. On the other hand, it was fun learning about packaging and merchandising. Moreover, my batch was mixed with other batch for this class, so it was exciting to learn from other people and actually see their works for inspiration.
Observation
I observed that I needed to be careful when designing a packaging. Not only the visual design, the purpose of it, but the die-line as well. Moreover, it was very crucial for me to make a prototype for each of the packaging. The measurement was the key of the folding, also the cutting, it needed to be perfectly cut. It was very stressful for me when it comes to making the die-line and doing the laser cut.
Findings
When it comes to packaging design it is important for us to be neat and patient while measuring and making the prototype. Once we are very sure about the prototype, with all the measurements and what not, then we can proceed to the die-line. It is also crucial for us to understand how to use the laser cut machine, how should we print our file, and how should we save our document.


Comments
Post a Comment